Pro Secrets for Painting Kitchen Cabinets

painted kitchen cabinets

Photo:  Brian Wilder

If your kitchen cabinets are solid but dated and dark, a fresh coat of paint can go a long way toward transforming the space without draining your bank account. You can hire a pro to spray-paint them for a thousand dollars or more, but there’s a less costly, and less messy, alternative to consider: Use a brush and paint the cabinets yourself.

"You don’t need to spray to get a smooth finish," says painting contractor John Dee, who has worked on a number of This Old House TV projects. He often brush-paints cabinets anyway because it gives him more control and avoids the risk of paint spray ending up where it’s not wanted. (Surface prep is the same whether you spray or brush.) Brushing is time-consuming, he warns, and could take up to a couple of weeks to complete. But the result is a durable, glass-smooth finish that’s the equal of anything from a spray gun. "You just need to use the best materials and take the time to sand and do the brushwork right," Dee says.
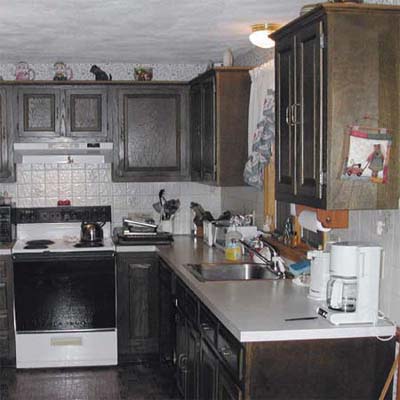
before photo of kitchen with dark wood cabinets, inset of John Dee sanding a cabinet door

Photo:  Brian Wilder

1. Prep the room

Before starting a kitchen paint job, empty the cabinets, clear off the counters, and remove freestanding appliances. Relocate tables and other furniture to another room. Tape rosin paper over the countertops and flooring, and tape plastic sheeting over the backsplash, windows, fixed appliances, and interior doorways (to protect the rest of the house from dust and fumes). Mask off the wall around the cabinets. Finally, set up a worktable for painting doors, drawers, and shelves.

Pro Tip: In kitchens the key to a good paint job is surface prep. "Old cabinets are covered with everything from hand oils to greasy smoke residue to petrified gravy," says Dee. "You’ve got to get all that off or the paint won’t stick."
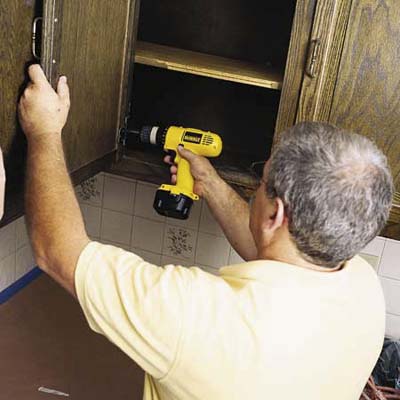
John Dee removing cabinet door with a cordless driver

Photo:  Brian Wilder

2. Remove doors, drawers, and shelves
Back out the hinge screws from the cabinet frame and remove the doors. Working methodically from left to right, top to bottom, label each one with a numbered piece of tape. Also, number the ends of cabinet shelves and the bottoms of drawers. Set aside the shelf-hanging hardware. At your worktable, remove the pulls and hinges and save what’s being reused. On the doors, transfer the number from the tape to the exposed wood under one hinge. Cover it with fresh tape.

Continue reading here at ThisOldHouse.com

Appearing Act: Island Rises Triggered by iPhone

Kitchen space is among the most valuable real estate in any house. You need room to work, but you also need space to move around. Where is the happy medium? Maybe it can be found in Tim Thaler‘s motorized kitchen island.

Thaler wanted the maximum possible amount of floor space in his kitchen, but he also wanted some extra storage and surface area.

He went about solving his problem in a unique way: by installing a kitchen island that stores under the floor, rising when summoned by a touch of a button on his iPhone.

The island’s top surface is (wisely, we think) covered with protective carpet squares when it is hidden, keeping the countertop from being marred with footprints and other unsavory detritus.

Although this is not a kitchen solution we can all afford (or one that all of us would know how to implement), the concept is so inspiring that it encourages us to think of other seemingly-impossible storage fixes in areas that seem cluttered beyond hope.

28 Ways to Refresh Your Bath on a Budget

By: STAN WILLIAMS, This Old House magazine

coordinating bathroom accents

Photo:  Ryan Kurtz

1. Coordinate Accents

Give your bath a designer touch with matching accessories. Here, the medicine cabinet’s silvery frame is echoed by the decorative metal outlet covers.

Similar to shown: Kohler 20-inch Recessed Medicine Cabinet, about $178, and Betsy Fields Design Brushed Satin Pewter standard wall plates, about $7 each; lowes.com

tiled bathroom countertop

Photo:  Ryan Kurtz

2. Tile the Countertop

An alternative to a stone slab, a tiled counter resists water but costs a lot less and is easy for DIYers to install. This terra-cotta top has white-painted wood edging to go with the vanity below. A bead of clear caulk keeps water away from the wood.

Similar to shown: Merola Tile Augusta 4-inch tile, about $8 per square foot;homedepot.com

Read the remaining 26 here at ThisOldHouse.com

Bathroom Waterfall Wall Sinks: Flowing Down…

Glacial white lets the swooping shape speak in the absence of color – no need to capture liquid in a basin or pierce this vessel, it simply sends water down to a floor drain and accents its path along the way.

This design from Eumar was inspired by Swedish waterfalls and intentionally eschew standards of conventional plumbing like exposed pipes or additive handles.

Why such a sculptural approach? Aside from adding interest to an ordinary bathroom, it also accentuates water usage, encouraging people to (hopefully) use less.

Shelving on Demand: Modular Ledges Flip Up & Down

Empty shelves can look strange or sad, leading us to try and fill them up … sometimes too fast. The solution? Modular fold-down wall shelves.

These work for books, but are more meant for odds and ends or decorative touches – the quick-but-temporary cleanup we do from time to time between bigger organizational efforts or the elements we want to show off.

Eeva Lithovius suggests that the shelf can serve as a kind of “chaos meter” reflecting its capacity quite openly and letting you know when it might be time to get more shelving … or to toss some things out.

A Year's Worth of Smart Home Solutions

Living room

Photo:  Simon Whitmore

Update Your Decor on the Cheap

Have a pile of inspirational magazine pages you’ve been waiting to make a reality? January and February are the best times to nab furniture at serious discounts—up to 60 percent off in some cases—as stores hold clearance sales to make room for new spring inventory.

January: Tin-Tile Fireplace Surround

While looking for a way to add personality to their new custom fireplace, Steve and Sandy Miller had this flash of genius: Why not use the same unique tin tiles that adorned their kitchen backsplash for the surround? The couple first chose their design—an ornate pattern of 3-inch squares, which they cut to fit from large panels. Then they covered the surround with cement board and affixed the tin with a heat-resistant construction adhesive. In total, the project took only a few days—but the result will look cozy all winter.

The rest of the year here at ThisOldHouse.com

75 Easy Spruce-Ups Under $75

Living area with a wallpapered alcove

1. Wallpaper an Alcove

Highlight an alcove by wallpapering the back wall.
Similar to shown: Fern Damask prepasted wallpaper, $44 for a 60-square-foot roll; yorkwall.com

Window herb garden

2. Create an In-Window Kitchen Herb Garden

Screw 1×4 wood cleats to the side jambs and insert tempered glass shelves. Two 3-inch-deep shelves for a standard 30-inch double-hung, $64;dullesglassandmirror.com

Read the rest at ThisOldHouse.com

How to Upgrade Front Door Hardware

How to Enhance an Entry with Hardware

Photo:  Ryan Benyi

Making a memorable first impression is tough if your front door has ho-hum hardware. Even worse is a tarnished, pitted entry set with a peeling lacquer finish, like the one below.

To give the door more polish, we shopped around for a shiny brass replacement. But rather than get a set from a specialty hardware shop, where they can easily top $1,000, we chose a Baldwin one-piece handle and tubular lock set with a handsome escutcheon for $179 from the home center (The Home Depot). Hardware manufacturers’ home-center lines, which range from $100 to $350, are also easier to retrofit because they’re designed for DIYers.

Completing the door’s makeover is a shapely new knocker for $41 and a gleaming kick plate for $66 (Cape Cod Brass), for a total project cost of $286.

Read more here at ThisOldHouse.com

Remodeling Activity Reaches Record Levels

home-remodelingAs the weather started to cool and kids went back to school, remodeling activity continued to soar in 2011. Recently, BuildFax unveiled its Remodeling Index for September 2011, which shows that remodeling activity reached a record high during the month. BuildFax also released data stating the most popular types of remodeling projects over the past five years.

The latest BFRI showed that September 2011 became the month with the highest level of remodeling activity since the Index was introduced in 2004 and represented the 23rd consecutive month of increases. The data revealed the most popular permitted residential remodeling jobs since 2006 have been roof remodels/replacements, followed by deck and bathroom remodels. The top eight types of remodels classified by are:

1. Roof (21.4%)
2. Deck (7.9%)
3. Bathroom (6.9%)
4. Garage (6.1%)
5. Kitchen (4.8%)
6. Basement (2.9%)
7. Office (1.7%)
8. Sunroom (0.7%)

Mortgage rates continue to be near record lows, and as homeowners from coast to coast refinance, they are continuing to update their current home and invest in their properties. The data shows that homeowners are not only doing important ‘maintenance’ projects, such as fixing their roof, but also taking on projects that add to the ‘livability’ of their homes by adding decks, remodeling their bathrooms and updating their kitchens. These are immediate fixes they will enjoy and that potential buyers look for.

September Signifies 23 Consecutive Months of Industry Growth

The Residential Remodeling Index rose 34 percent year-over-year—and for the twenty-third straight month—in September to 141.4, a new high number in the index. Residential remodels in September were up month-over-month 2.8 points (2 percent) from the August value of 138.6, and up year-over-year 36.3 points from the September 2010 value of 105.1.

The BFRI is the only source directly reporting residential remodeling activity across the nation with monthly information derived through related building permit activity filed with local building departments across the country. This monthly report provides month-over-month and year-over-year comparisons on trends in remodeling activity for the entire United States, as well as for the four major regions of the country: Northeast, South, Midwest, and West.

Half of Country See Month-over-Month Gains

In September 2011, the West (6.4 points; 4.6 percent) and the Midwest (5.73 points; 4.9 percent), all had month-over-month gains, while the Northeast (1.1 points; 1.5 percent) and the South (2.9 points; 2.9 percent) saw a decline. Regions up in year-over-year gains from September of 2010: the West (44.4 points; 43.5 percent), the Midwest (16.8 points; 15.9 percent) and the South (8 points; 9 percent). The Northeast dropped 3.7 points (4.7 percent).