How to Trick Out a Dorm Room

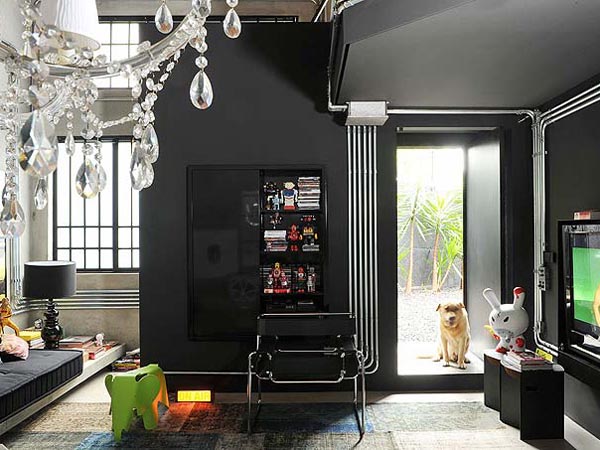
The thrill of starting college and moving out of one parents’ home can be swiftly undermined by the sight of your new dorm room. Concrete walls, dingy floor and lousy lighting – this is hardly an ivory tower! Don’t despair. With a little creativity and very little cash, you can transform your space from an institutional cell into a cozy campus retreat. Click on the preview above to expand the graphic and see some tips from Dawn Falcone, interior designer and professional organizer.

Dorm_Room_Redesign

click image for larger view

Quick Interior Makeover Ideas

Don’t you just want to sometimes change something in the room without actually doing much? If so these quick interior makeover ideas will help you with that. While you could change your room color or shade in almost an instance for a makeover sometimes there are too little funds or time for dealing with the paint, covering every inch of the room to protect from the paint drop or spillage. So here are a few ways you could change you interior design considerably without spending a penny or much time.

Quick Interior Makeover Ideas

Furniture Rearrangement

The way you arrange or rearrange furniture can make a big difference in the whole interior design. Since furniture is such a big part of home decor you may consider starting your makeover with rearranging it. The great thing about this is that you get to experiment a lot with the angles, arrangement and create the whole new atmosphere in the room.

Change of Lighting

Change the lighting position in the room. Swap light sources and add focus on areas that were hidden before. This will give your interior an instant makeover as the lighting plays a great part at highlighting and hiding objects. Thus you’ll be able to find a new light focus and create a different mood and atmosphere in the room.

Handmade

Handmade is great and handy when it comes to interior design and home decor. Recycle old junk, furniture, accessories and objects to create something new and add it as an accent and detail to your interior. You can sew new interesting pillow cases for your sofa’s throw pillows, redecorate the old curtains, and use patchwork to make a new coverlet for a room. If you are into art then creating a wall art of your own right on the wall or drawing a painting to hang on the wall can be not only great as a makeover for your interior but also as an outlet for your creativity.

9 Ways to Upgrade Tired Kitchen Cabinets

Kitchen cabinet upgradesStylish and Sensible Storage

Kitchens are more than just where you prepare your meals. Nowadays, the kitchen is a command center, dining area, and the one room in the home where families spend the most time together. If you’re looking for a way to spruce up the space, and an overhaul isn’t in the budget, try one of these easy kitchen cabinet upgrades. You can brighten the room with a coat of cabinet paint, add handy storage features like a pull-out shelf or a free-standing island, or even build a window seat with stock cabinets—all with our help! Here are 9 of our top kitchen cabinet upgrades, along with step-by-step instructions chock full of pro tips, shopping lists, and tools lists to help you get the job done right.

read the rest here at thisoldhouse.com

Flipping Nifty: Flexible Folding Plug for Interior Wall Sockets

Until electricity is entirely wireless, the question of how to deal with dense plugs will continue to nag at designers – this solution, while nifty, poses a new problem while trying to solve the old one.

There are angled, bent and flush-fitting solutions, but when you go to change configurations (like standing up from a low seat with your laptop) your cord may have other ideas.

Huang Guanglei‘s vision for this flexing plug looks perfect, but in addressing the issue of mobility it creates a problem of power. Specifically, it is designed to flip up and down not just to accommodate movement but also to turn on and off. This last tweak is neat insofar as it results in an adjustable dimmer switch for lights, but less functional for something that uses continuous power to run.

How to Gain More Closet Space Without Renovating

illustration of a well organized closet

No Renovation Required

We consulted with closet-design pros from across the country to learn the secrets to creating the ultimate storage unit, no power tools required.

Double Up

You need to dedicate only two-thirds of your closet to hanging rods. To maximize that space, mount two of them—one well above eye level for longer garments and one a little more than 3 feet off the ground for shorter (or foldable) ones. Position both at least 1 foot from the back wall.

Read the rest here at thisoldhouse.com

Why Your Green Home Improvements Aren’t Paying Off

By: Karin Beuerlein

Forget big savings on your energy bills if you make green home improvements. Instead, choose green retrofits and home improvements that offset rising energy prices.

Eco Friendly Home Improvements Sustainable Home ImprovementsInsulating your home, including the attic, can shave up to 10% off your energy bills. Image: CertainTeed

If you made green home improvements over the last few years with high hopes for lower energy bills and a quick recoup of your initial investment, you got an awakening: Your monthly bottom line likely held steady—or, worse, went up.
Before you shun green, recalibrate your thinking from expecting fat returns to understanding the new bottom line: Smart retrofits help you hold your ground against rising energy costs.

Why have my green home improvements fallen flat?

Energy prices as a whole have gone up over the last decade, especially in certain regions of the country.
Although natural gas prices have dipped a bit since 2008 and electricity prices have stayed level, the trend line goes up for both from 2011 forward.
The U.S. Energy Information Administration estimates an average annual increase in residential energy costs of 2.3% through 2035.
So…if energy cost projections hold, and assuming an average annual American energy bill of $2,200, you’ll pay 2.3% more each year (that’s $50 the first year) if you do nothing to reduce your consumption. Your bill will inch closer to $4,000 by the year 2035. Ouch.

3 energy saving retrofits that pay off

If the only reason you’re making retrofits is to manage energy costs, look for projects with maximum bang for the buck.
Rule of thumb: Try to beat the 2.3% annual average with green home improvements that reduce your energy consumption by 5% or more but have a modest initial investment. And don’t forget to ask whether your utility or state government offers rebates or tax credits for these improvements.

1. Seal and insulate ductwork that runs through unheated spaces—the attic, a crawl space, a garage. It’s not glamorous, but it can improve the efficiency of your heating system by 20%—a 5% bill reduction overall. If you hire an HVAC pro for this job, you’ll invest a few hundred dollars for labor and materials.

2. Buy a programmable thermostat. Is it possible you haven’t done this yet? For just $25 to $250, the you can save, on average, around 8% on energy bills simply by programming it properly.

3. Add attic insulation and seal air leaks. One of the best energy-saving improvements out there, because insulating and sealing your home can reduce your energy bills by 10%. Upgrading your attic insulation to the R-value recommended for your region costs anywhere from $.25 to $1 per square foot, including materials and labor; it’s less if you do it yourself.

But you won’t get the maximum savings if you don’t seal air leaks, so plan this as a combo job. Caulking and weather-stripping typically costs from $50 to $350, depending on the size of your house.

How to Hang Pictures Without Destroying Your Walls

Whether you rent or own, you probably want to put some art on the walls and spice up your space. You also probably want to do this without damaging the walls trying to hang the same photo five times or having it fall down over and over again. Here’s how to hang your art and posters the right way the first time without wrecking your walls in the process.

How you should hang art on the way depends largely on how heavy and large the poster or frame you want to put up actually is. Still, the key to hanging photos without killing your walls starts with planning, long before you put the first nail in the wall or drill the first hole.Photo by David Hunter.

How to Hang Pictures Without Destroying Your Walls

Plan Ahead

Pick your space. If you don’t already know where you want to hang your art or posters, now’s the time to start looking and making sure that the space you want your art to hang is large enough to accommodate it. Also, make sure you’re not cramming so many frames, photos, and posters in such a small space that you can’t manage them or space them evenly. Photo by Robert Taylor.

Hang at eye-level. One design tip that will help you maximize the use of your wall space without losing sight of your art is to always hang your art at eye-level where you’ll be able to see them without having to crane your neck up or look down your nose to see what you’re hanging on the wall. If you don’t want to eyeball what “eye level” is, run a tape measure from the floor to the ceiling, and have someone else mark on the measure where your eyes naturally rest when you’re standing a foot or two away from the wall.

Get a stud finder. While you may not need to hang light posters in acrylic or plastic frames or photographs from a stud, if you do have an expensive piece in a heavy frame, you should know where the studs behind your walls are. Even if you don’t need your studs for your artwork, take a stud finder and mark-perhaps at the top of your wall where it meets the ceiling-where the studs are with a pencil. Then you’ll never need to worry again.

Mount the Hardware

Measure first. Make sure you mark off any places you need to hammer nails or drill holes for brackets before you try to hang the piece. Use a straight-edge, ruler, or level to make sure the sides are level before you actually hold the art up to the wall. Mark the center line (the halfway point between the bottom and the top of the art, which should also rest at eye-level,) the edges, and all the sides. When you’re finished, putting the art up should be like fitting a puzzle piece into a slot. Making sure you take the time to mark where the art will go first and that it’s level and spaced well from other pieces will save you from mounting a piece only to take it down and have to re-mount it somewhere else later.

How to Hang Pictures Without Destroying Your Walls
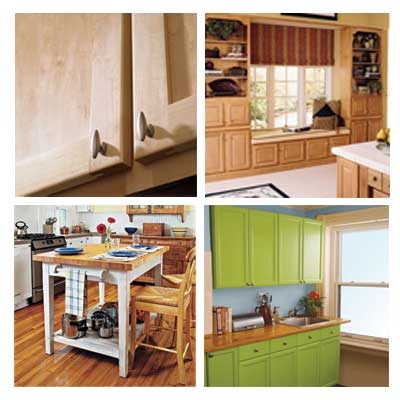
Use the right tools. Picture hanging kits, easily available at most hardware and department stores, often have all the materials you need to hang most common frames on your walls. Light pieces like photos, movie posters, and other art will likely require just a nail, or a nail and a bracket or picture hanger (most light frames have a bracket on the back already.) Photo by Kevin Williamson.

If you’re facing something over 25lbs however, this is where you’ll be happy you marked the studs. Depending on how heavy the art is you may consider using a plastic wall anchor in the drywall, or solidly mounting the art in the stud using a mounting bracket. Don’t use drywall screws in wood, and don’t use wood screws in drywall – go to your local hardware store and find the type of picture hanger for the size and weight you’re dealing with. Using the wrong mounting brackets or tools will inevitably lead you to waking up in the middle of the night to the sound of your art crashing to the floor.

Use blank paper for dummy art. There’s no need to try and hold your art or frame up to the wall while simultaneously marking or drilling holes in it. Put the art on the floor, and lay notebook or construction paper around the edges, then tape the paper together so you have a large sheet that’s the same size as the piece you want to hang. Then use the sheet, now the same height and width as the art, as a guide that you can tape to the wall to mark your holes or even drill your holes through the hanging paper without worrying if you’re in the right spot.

How to Hang Pictures Without Destroying Your Walls

Mount the Art

Once you’ve measured, centered, and mounted your hardware, placing the art on the wall should be a simple task, and you shouldn’t have to spend too much time tilting the art to make sure it’s level. You can save the paint on your walls from scuffs and scratches though by adding small adhesive bits of felt to the corners or bottom of the frame where it’s in direct contact with the wall. If you don’t have anything like that, a bit of post-it note or masking tape will work too: anything to keep the frame from scraping against the wall directly. Photo by Horia Varlan.

Bonus Tip: Use Disposable Hooks

3M’s Command line of plastic and metal hooks also work well to hang light pieces of art and posters from drywall or concrete, without the need for drills or nails. Apartment dwellers in rental units, college students, or anyone else who’s technically prohibited from hammering or drilling will find them especially useful. The adhesive strips that come with Command hooks go on easily, cure quickly, and remove without damaging the walls (in most cases,) which is a huge benefit if you like to change out the art on your walls frequently, or just don’t want to risk drilling or hammering nails into them.

The trouble with these kinds of disposable hooks, Velcro strips, and other mounting strips is that they’re generally rated for very light objects. If you have small, light plastic or acrylic frames with photos or printed posters in them, they’ll work well. If you have a solid wood frame or oversized pieces of art, they may hold for a few days, but your art will come clattering down unless you use three or four hooks to hold it up.

Hanging a picture shouldn’t have to be so hard that you’re worried about damaging your walls in the process. With a little preparation, you can do it right the first time and hang your artwork easily, without ending up with multiple nail-holes in your wall that you subsequently have to patch up or cover with the art you hung.

What are some of your best art and photo-hanging tips? How do you decorate your walls without wrecking them? Share your tips in the comments below.

Hidden Handle: Kitchen Knife Grip Opens Secret Bread Box

It is a little like those fanciful secret rooms opened at the twist of a candlestick, tilt of a lamp or pull of a book. In this case, though, the ordinary object is a bread knife that tips a concealed mechanism and operates the top of a bread box.

When one sees knives stuck into wooden blocks in the kitchen, one assumes they simply sit waiting to be removed and used. Instead, this block acts as a shelf, cover and opening – and the knife does more than just cut.

Its design, by Yael Mer and Shay Alkalay, utilizes parallel hinging strips like those found in vintage sewing boxes. These disappear in the wall-mounted system, making the purpose of the box less than obvious at first glance – it could simply be extra surface area and knife

Compact Dishwasher Fits into Kitchen Sink Slot

When I saw this, I thought of those with a small getaway cabin. Every apartment, condo or house needs a way to wash dishes, but within space for full-sized dishwashers, some of us have a tendency to pile tableware into sinks in an endless (non-rinse, non-dry) cycle.

Thus the FlashDry(R) from KitchenAid, since discontinued (perhaps due to its outrageous price), but a still a brilliant example of integrated design solutions for small-space living.

The lid doubles as a draining board, and the unit comes with a snap-on cutting board custom-fitted to the top to further enhance the usability of this surface area. It is well-organized inside with a larger-than-average silverware basket, capacity-expanding capabilities for larger and awkwardly-shaped pots or pans.

With room enough too accommodate up to five place settings at a time, this relatively tiny device also uses 50% less water than a typical washer for similarly-sized loads, can run a full cycle in 20 to 30 minutes, and the lid pops open at the end to release internal steam and pressure.